VPP TCP Termination
Introduction
VPP’s host stack is a user space implementation of a number of transport, session and application layer protocols. It leverages VPP’s graph based forwarding model and vectorized packet processing to ensure high throughput and scale transport protocol termination.
iperf3 is a tool for active measurements of the maximum achievable bandwidth on IP networks. In this guide it is used to measure the maximum attainable goodput of the VPP’s host stack on DUT node.
This guide explains in detail on how to integrate iperf3 with VPP’s host stack for TCP termination cases. The integration is done via LD_PRELOAD which intercepts syscalls that are supposed to go into the kernel and reinjects them into VPP. Users can execute bundled scripts in dataplane-stack repo to quickly establish the TCP termination cases or manually run the use cases by following detailed guidelines step by step.
Network Stack Layers
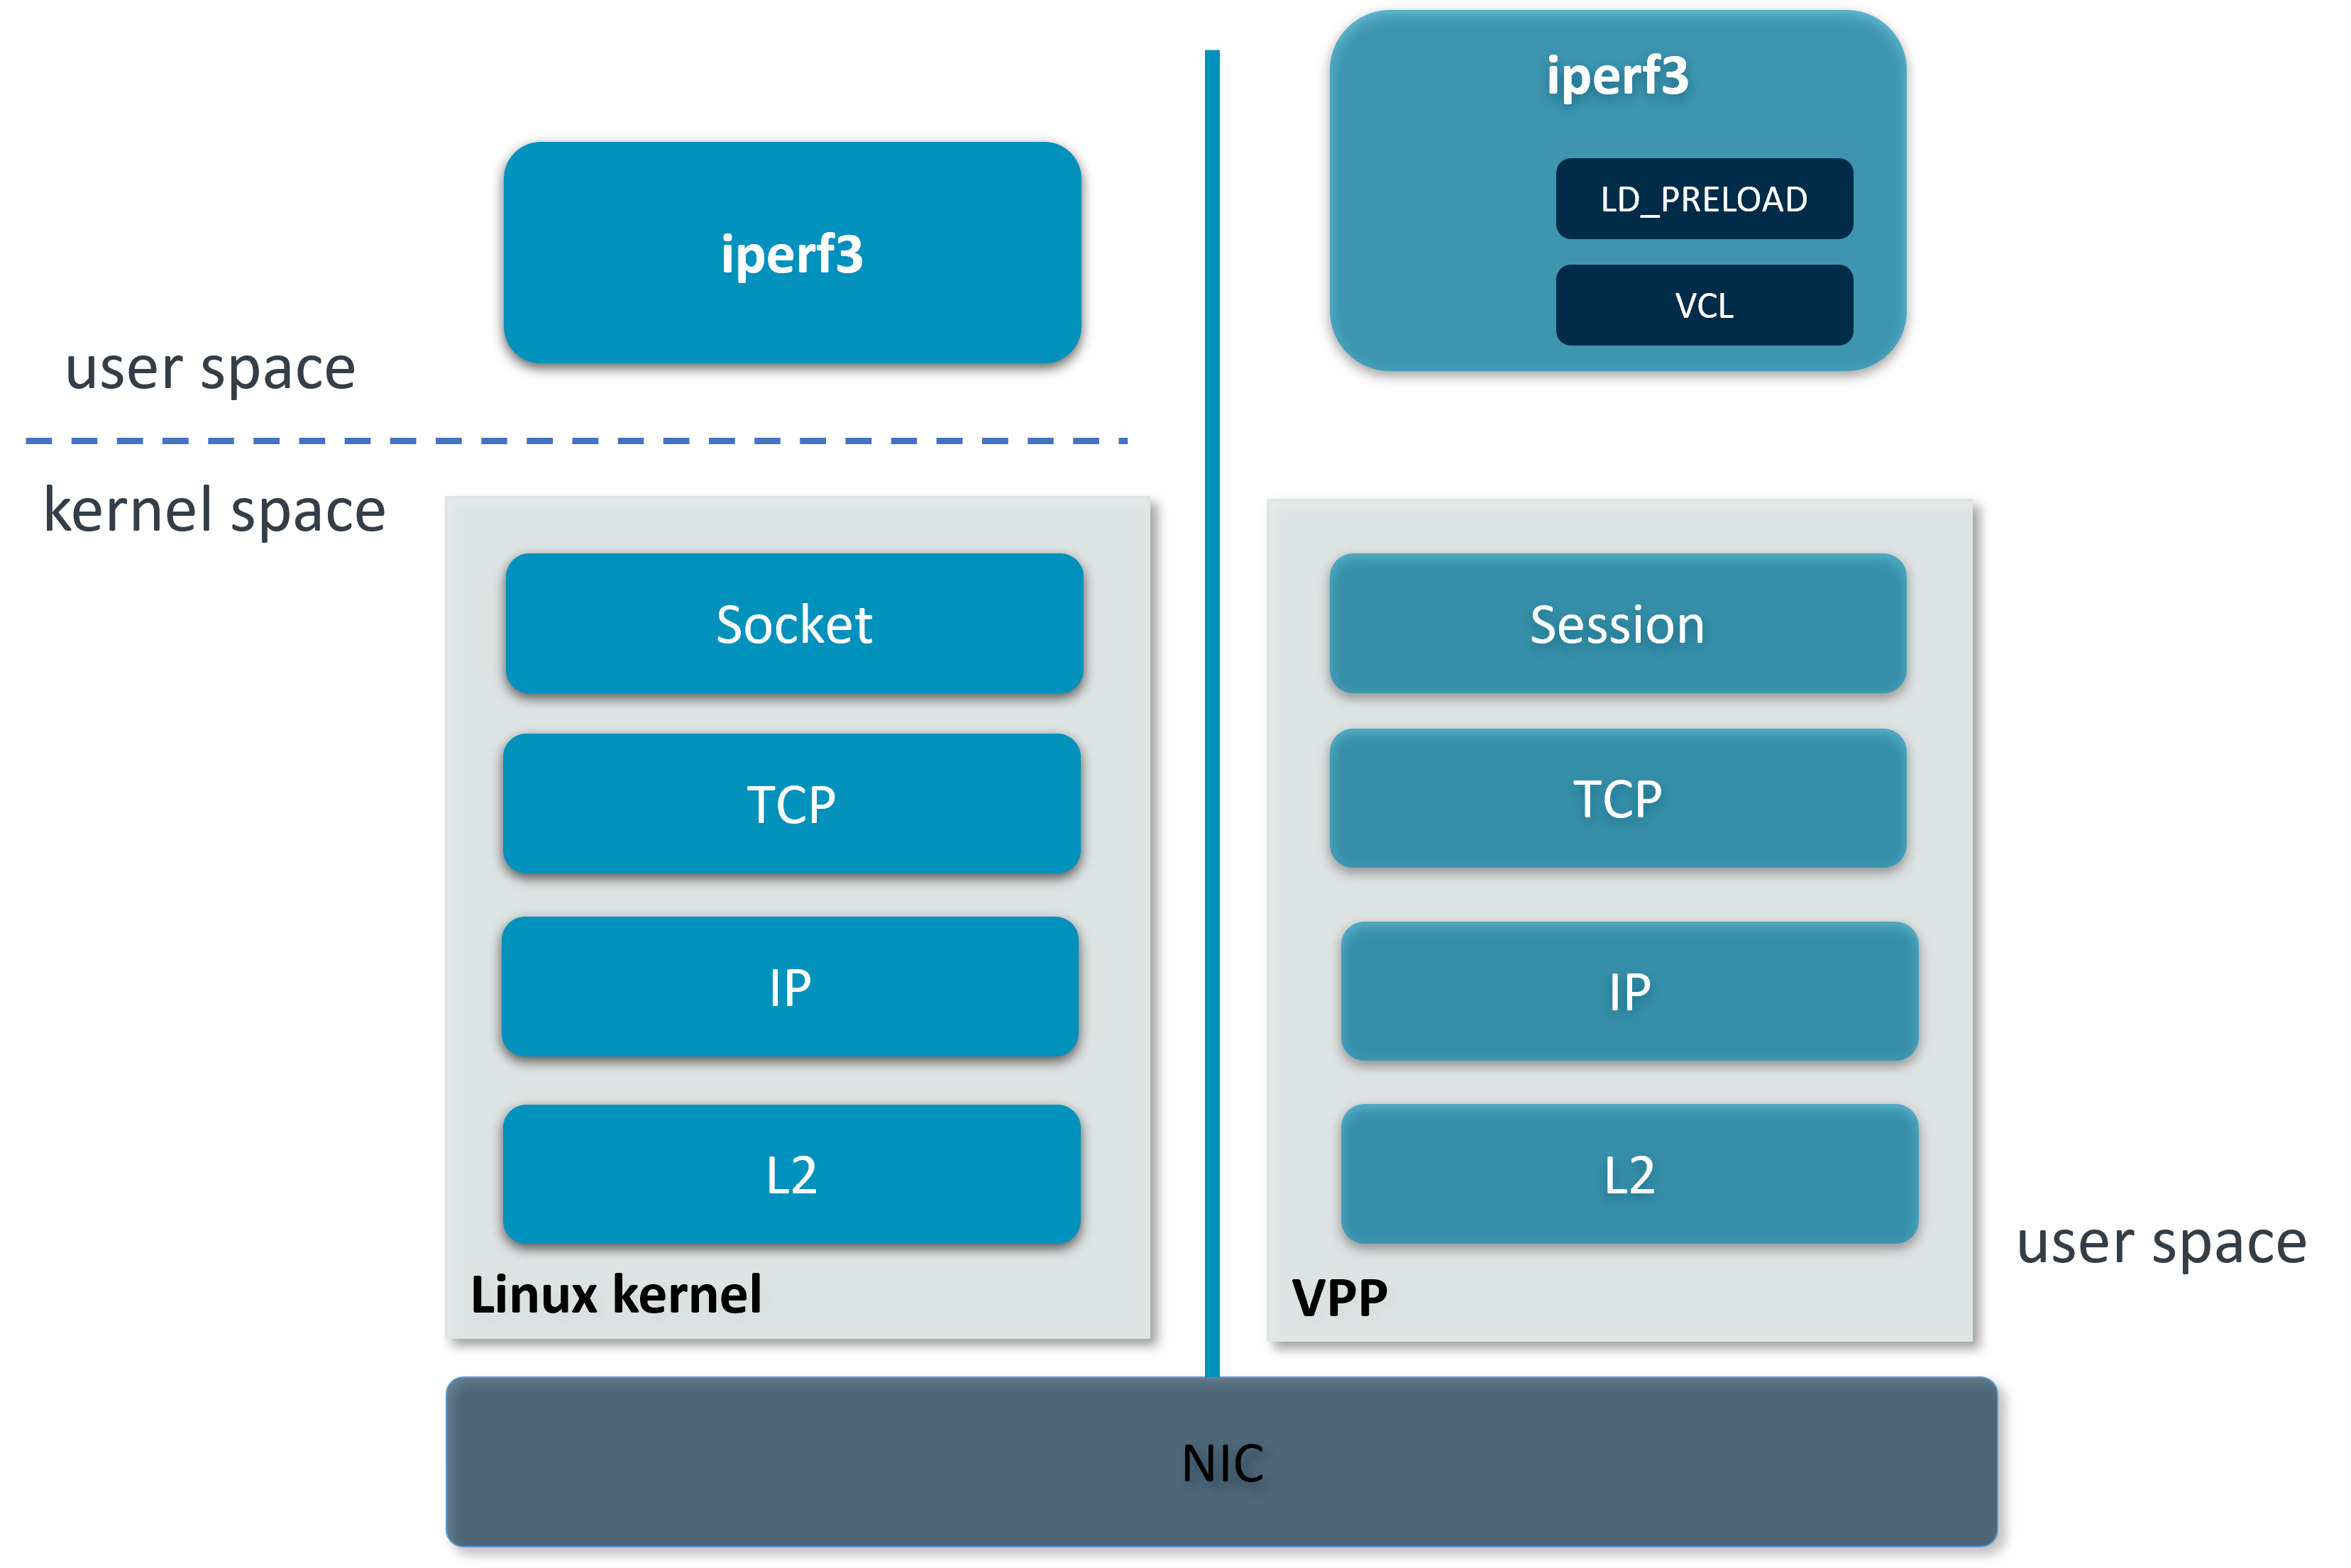
Linux kernel stack VS VPP’s host stack.
VPP’s host stack provides alternatives to kernel-based sockets so that applications can take full advantage of VPP’s high performance. It implements a clean slate TCP that supports vectorized packet processing and follows VPP’s highly scalable threading model. The implementation is RFC compliant and supports many high-speed TCP protocol features. VPP’s host stack also provides a pluggable transport session layer that abstracts the interaction between applications and transports using a custom-built shared memory infrastructure. There is also VPP Comms Library (VCL) included to ease the consumability of the stack from application perspective. VCL manages the interaction with the session layer, abstracts session to integer session handles and exposes its own asynchronous communication functions.
This guide demonstrates two kinds of iperf3 connection:
Loopback connection on DUT node
Ethernet connection between DUT and client nodes
Loopback Connection
The loopback interface is a software virtual interface that is always up and available after it has been configured. In this setup, both iperf3 server and client run over VPP’s host stack on the DUT and communicate with each other through VPP loopback interfaces.
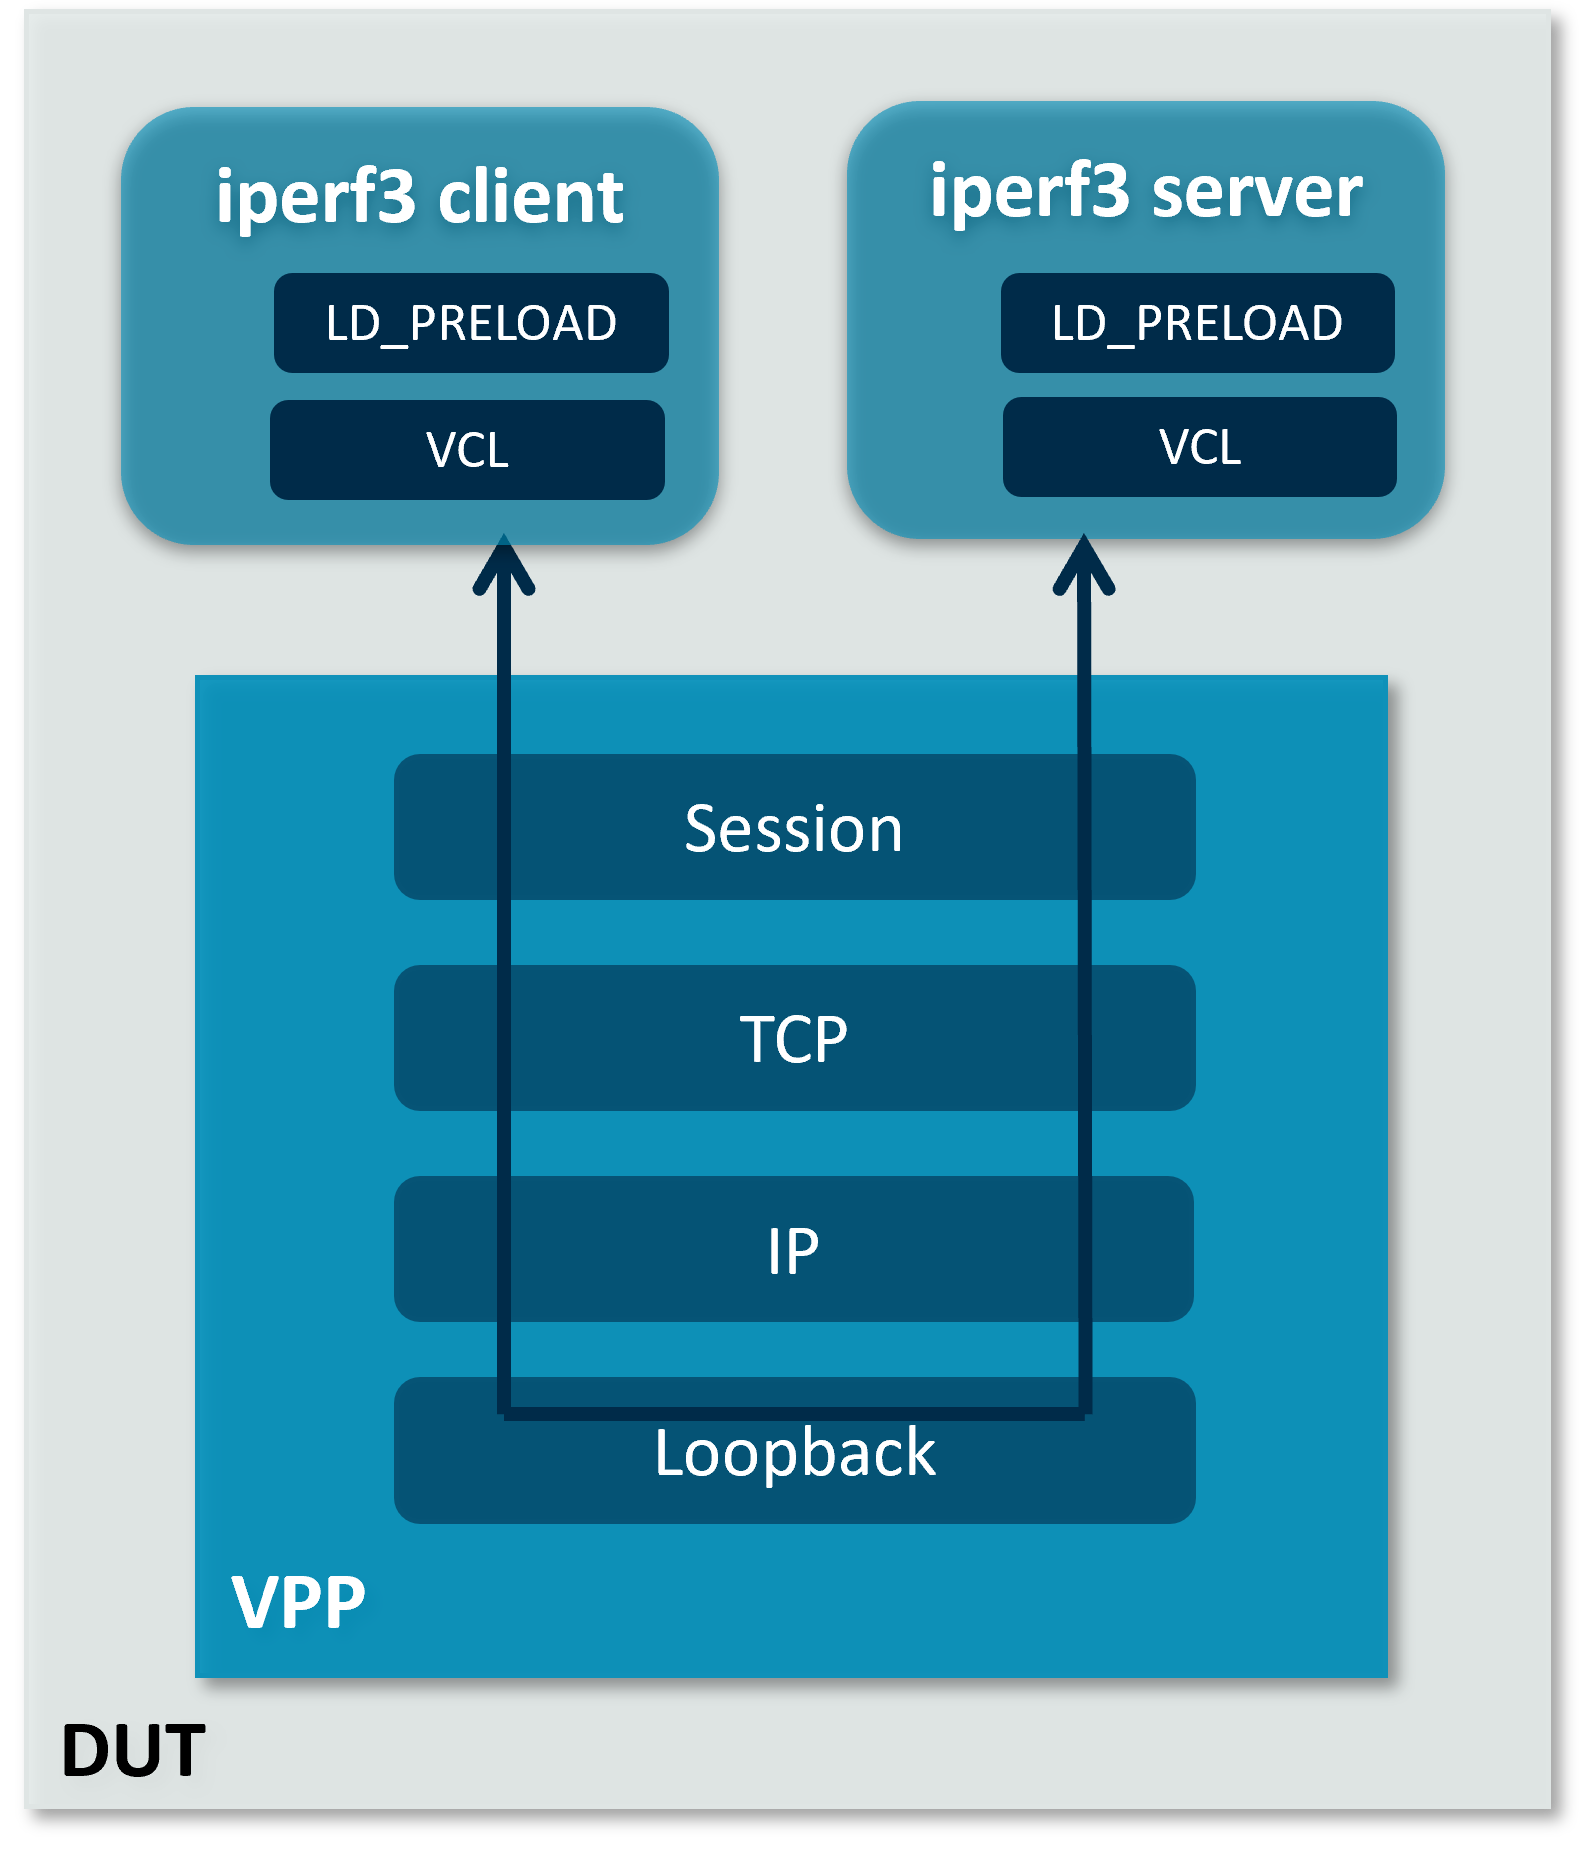
Loopback connection
Note
This setup requires three isolated cores. Cores 1-3 are assumed to be isolated in this guide.
Automated Execution
Quickly set up VPP & iperf3 and test TCP termination use case:
cd $NW_DS_WORKSPACE/dataplane-stack
./usecase/tcp_term/run_vpp_hs.sh -l -c 1
./usecase/tcp_term/run_iperf3_server.sh -l -c 2
./usecase/tcp_term/run_iperf3_client.sh -c 3
Note
Use -h to check scripts supported options.
If the case runs successfully, the measurement results will be printed:
Connecting to host 172.16.1.1, port 5201
[ 33] local 172.16.2.1 port 43757 connected to 172.16.1.1 port 5201
[ ID] Interval           Transfer     Bitrate         Retr         Cwnd
[ 33]   0.00-1.00   sec  2.23 GBytes  19.2 Gbits/sec  65535        555 MBytes
[ 33]   1.00-2.00   sec  2.23 GBytes  19.2 Gbits/sec  4294901761   0.00 Bytes
[ 33]   2.00-3.00   sec  2.23 GBytes  19.1 Gbits/sec  65535        555 MBytes
[ 33]   3.00-4.00   sec  2.23 GBytes  19.2 Gbits/sec    0          555 MBytes
[ 33]   4.00-5.00   sec  2.23 GBytes  19.2 Gbits/sec  4294901761   0.00 Bytes
[ 33]   5.00-6.00   sec  2.23 GBytes  19.2 Gbits/sec  65535        555 MBytes
[ 33]   6.00-7.00   sec  2.23 GBytes  19.2 Gbits/sec  4294901761   0.00 Bytes
[ 33]   7.00-8.00   sec  2.23 GBytes  19.2 Gbits/sec  65535        555 MBytes
[ 33]   8.00-9.00   sec  2.23 GBytes  19.2 Gbits/sec    0          555 MBytes
[ 33]   9.00-10.00  sec  2.23 GBytes  19.2 Gbits/sec    0          -1874590816.00 Bytes
- - - - - - - - - - - - - - - - - - - - - - - - -
[ ID] Interval           Transfer     Bitrate         Retr
[ 33]   0.00-10.00  sec  22.3 GBytes  19.2 Gbits/sec  65535             sender
[ 33]   0.00-10.00  sec  22.3 GBytes  19.2 Gbits/sec                  receiver
Note
VPP’s host stack does not support TCP socket option TCP_INFO to get TCP
connection information, so Retr and Cwnd columns in above output are meaningless.
Stop VPP and iperf3:
./usecase/tcp_term/stop.sh
Manual Execution
Users can also set up VPP & iperf3 and test TCP termination case step by step.
VPP Setup
Declare a variable to hold the CLI socket for VPP:
export sockfile="/run/vpp/cli.sock"
Run VPP as a daemon on core 1 with session layer enabled:
cd $NW_DS_WORKSPACE/dataplane-stack/components/vpp/build-root/install-vpp-native/vpp/bin
sudo ./vpp unix {cli-listen ${sockfile}} cpu {main-core 1} tcp {cc-algo cubic} session {enable use-app-socket-api} plugins {plugin dpdk_plugin.so {disable}}
For more VPP configuration parameters, refer to VPP configuration reference.
Create loopback interfaces and routes by following VPP commands:
sudo ./vppctl -s ${sockfile} create loopback interface
sudo ./vppctl -s ${sockfile} set interface state loop0 up
sudo ./vppctl -s ${sockfile} create loopback interface
sudo ./vppctl -s ${sockfile} set interface state loop1 up
sudo ./vppctl -s ${sockfile} ip table add 1
sudo ./vppctl -s ${sockfile} set interface ip table loop0 1
sudo ./vppctl -s ${sockfile} ip table add 2
sudo ./vppctl -s ${sockfile} set interface ip table loop1 2
sudo ./vppctl -s ${sockfile} set interface ip address loop0 172.16.1.1/24
sudo ./vppctl -s ${sockfile} set interface ip address loop1 172.16.2.1/24
sudo ./vppctl -s ${sockfile} app ns add id server secret 1234 if loop0
sudo ./vppctl -s ${sockfile} app ns add id client secret 5678 if loop1
sudo ./vppctl -s ${sockfile} ip route add 172.16.1.1/32 table 2 via lookup in table 1
sudo ./vppctl -s ${sockfile} ip route add 172.16.2.1/32 table 1 via lookup in table 2
For more detailed usage on above commands, refer to the following links:
Declare a variable to hold the LD_PRELOAD library for VCL:
export LDP_PATH="$NW_DS_WORKSPACE/dataplane-stack/components/vpp/build-root/install-vpp-native/vpp/lib/aarch64-linux-gnu/libvcl_ldpreload.so"
Note
Any use of ~ in LDP_PATH will expand to the root user’s home directory when used later in the guide.
iperf3 Server Setup
VCL parameters can be configured through VCL configuration file. A VCL configuration
sample for iperf3 server is provided at $NW_DS_WORKSPACE/dataplane-stack/usecase/tcp_term/vcl_iperf3_server_lb.conf
with the following contents:
vcl {
  rx-fifo-size 4000000
  tx-fifo-size 4000000
  namespace-id server
  namespace-secret 1234
  app-scope-global
  app-socket-api /var/run/vpp/app_ns_sockets/server
}
The above configures VCL to request 4MB receive and transmit FIFO sizes and access to global session scope. Additionally, it provides the path to session layer’s app namespace socket for iperf3 server. For more VCL parameters usage, refer to VPP VCL reference.
VCL_CONFIG provides VCL with a configuration file to read during startup. Start
the iperf3 server on core 2 as a daemon over VPP’s host stack, providing the VCL
configuration file mentioned above:
sudo taskset -c 2 sh -c "LD_PRELOAD=${LDP_PATH} VCL_CONFIG=$NW_DS_WORKSPACE/dataplane-stack/usecase/tcp_term/vcl_iperf3_server_lb.conf iperf3 -4 -s -D"
To examine the iperf3 server session in VPP, use the command sudo ./vppctl -s ${sockfile} show session verbose.
Here is a sample output for iperf3 server session:
Connection                                                  State          Rx-f      Tx-f
[0:0][T] 172.16.1.1:5201->0.0.0.0:0                         LISTEN         0         0
Thread 0: active sessions 1
Test
A VCL configuration sample for iperf3 client is provided at $NW_DS_WORKSPACE/dataplane-stack/usecase/tcp_term/vcl_iperf3_client.conf
with the following contents:
vcl {
  rx-fifo-size 4000000
  tx-fifo-size 4000000
  namespace-id client
  namespace-secret 5678
  app-scope-global
  app-socket-api /var/run/vpp/app_ns_sockets/client
}
Start the iperf3 client on core 3 over VPP’s host stack to connect to iperf3 server, providing the VCL configuration file mentioned above:
sudo taskset -c 3 sh -c "LD_PRELOAD=${LDP_PATH} VCL_CONFIG=$NW_DS_WORKSPACE/dataplane-stack/usecase/tcp_term/vcl_iperf3_client.conf iperf3 -c 172.16.1.1"
If both iperf3 client and server run successfully, measurement results will be printed by iperf3 client:
Connecting to host 172.16.1.1, port 5201
[ 33] local 172.16.2.1 port 43757 connected to 172.16.1.1 port 5201
[ ID] Interval           Transfer     Bitrate         Retr         Cwnd
[ 33]   0.00-1.00   sec  2.23 GBytes  19.2 Gbits/sec  65535        555 MBytes
[ 33]   1.00-2.00   sec  2.23 GBytes  19.2 Gbits/sec  4294901761   0.00 Bytes
[ 33]   2.00-3.00   sec  2.23 GBytes  19.1 Gbits/sec  65535        555 MBytes
[ 33]   3.00-4.00   sec  2.23 GBytes  19.2 Gbits/sec    0          555 MBytes
[ 33]   4.00-5.00   sec  2.23 GBytes  19.2 Gbits/sec  4294901761   0.00 Bytes
[ 33]   5.00-6.00   sec  2.23 GBytes  19.2 Gbits/sec  65535        555 MBytes
[ 33]   6.00-7.00   sec  2.23 GBytes  19.2 Gbits/sec  4294901761   0.00 Bytes
[ 33]   7.00-8.00   sec  2.23 GBytes  19.2 Gbits/sec  65535        555 MBytes
[ 33]   8.00-9.00   sec  2.23 GBytes  19.2 Gbits/sec    0          555 MBytes
[ 33]   9.00-10.00  sec  2.23 GBytes  19.2 Gbits/sec    0          -1874590816.00 Bytes
- - - - - - - - - - - - - - - - - - - - - - - - -
[ ID] Interval           Transfer     Bitrate         Retr
[ 33]   0.00-10.00  sec  22.3 GBytes  19.2 Gbits/sec  65535             sender
[ 33]   0.00-10.00  sec  22.3 GBytes  19.2 Gbits/sec                  receiver
Note
VPP’s host stack does not support TCP socket option TCP_INFO to get TCP
connection information, so Retr and Cwnd columns in above output are meaningless.
For more detailed iperf3 usage, refer to iperf3 usage reference
Stop
Kill VPP:
sudo pkill -9 vpp
Kill iperf3 server:
sudo pkill -9 iperf3
Ethernet Connection
In this TCP termination scenario, iperf3 server and client run on separated hardware platforms and are connected with Ethernet adapters and cables. iperf3 server runs over VPP’s host stack on DUT, and iperf3 client runs over Linux kernel stack on client node.
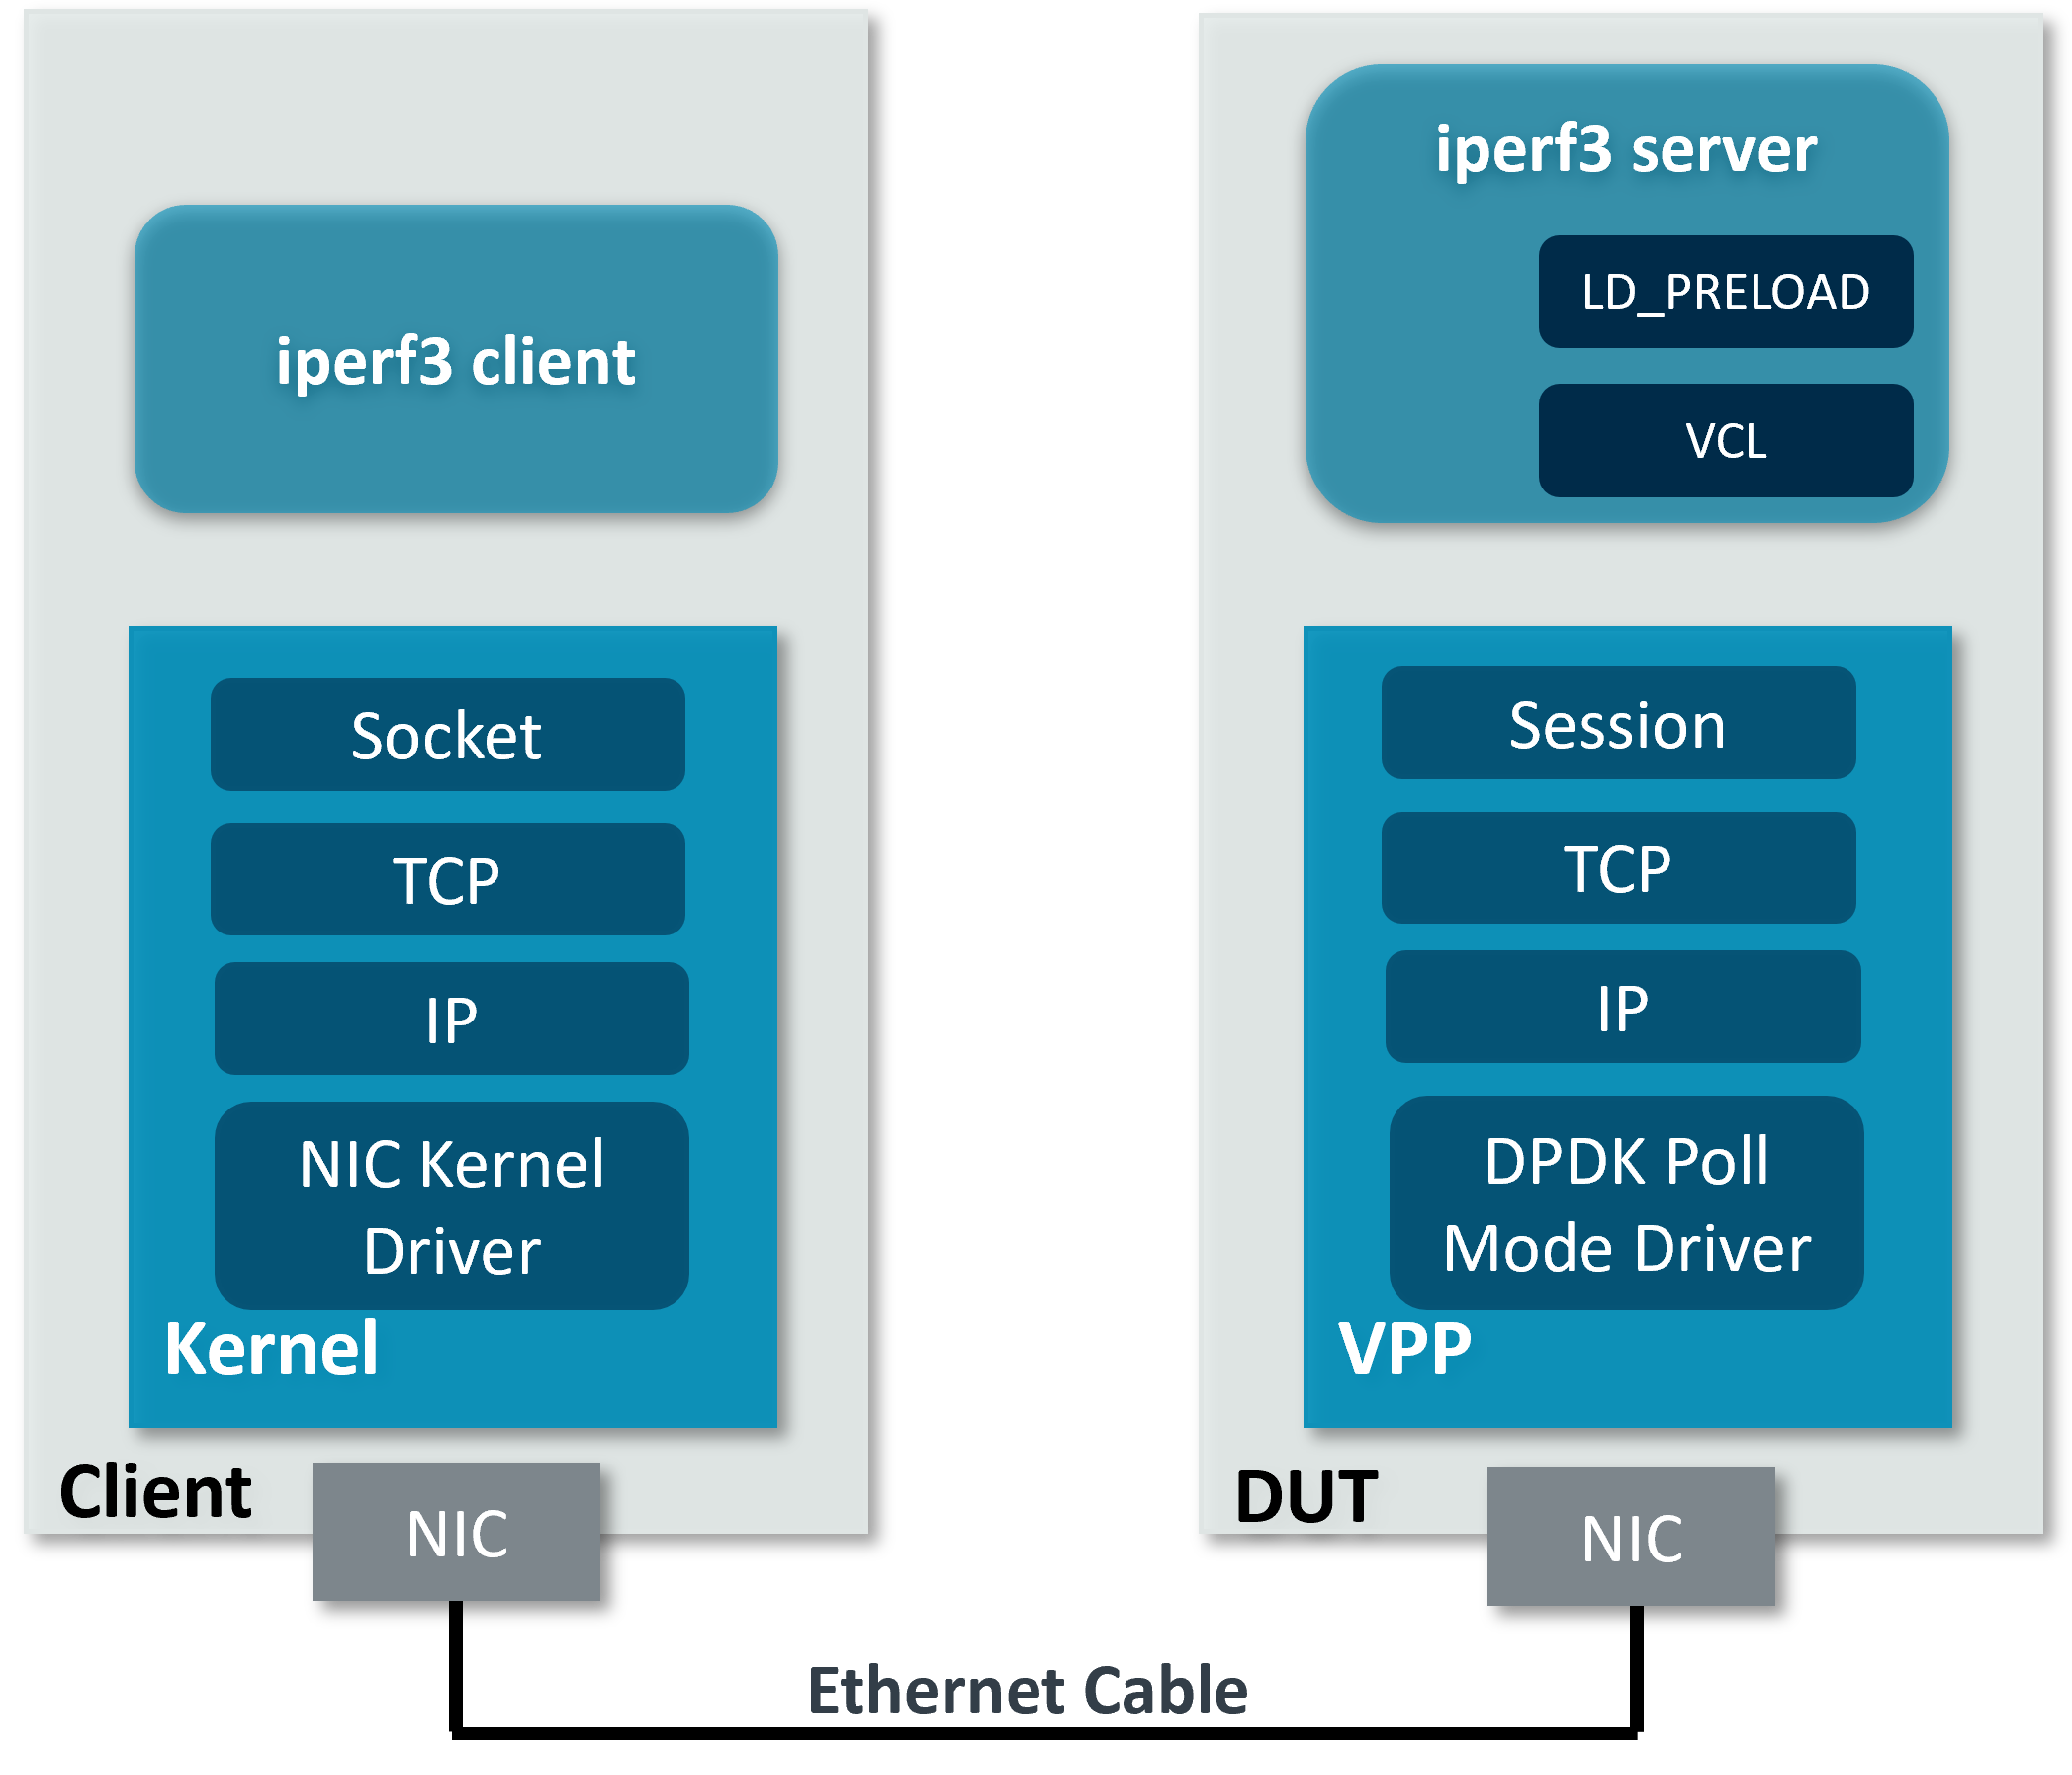
Ethernet connection
To find out which DUT interface is connected to the client node,
sudo ethtool --identify <interface_name> will typically blink a light on the
NIC to help identify the physical port associated with the interface.
Get interface name and PCIe address from lshw command:
sudo lshw -c net -businfo
The output will look similar to:
Bus info          Device      Class      Description
====================================================
pci@0000:07:00.0  eth0        network    RTL8111/8168/8411 PCI Express Gigabit Ethernet Controller
pci@0001:01:00.0  enP1p1s0f0  network    MT27800 Family [ConnectX-5]
pci@0001:01:00.1  enP1p1s0f1  network    MT27800 Family [ConnectX-5]
In this setup example, enP1p1s0f0 at PCIe address 0001:01:00.0 is used to
connect with client node. The IP address of this NIC interface in VPP is configured
as 172.16.3.1/24. The IP address of the client node NIC is 172.16.3.2/24, which can be configured by command ifconfig <interface_name> <ip_address>.
Install iperf3 on the client node. If running Ubuntu 22.04 or later, apt install iperf3
will be sufficient. For other Linux distributions, please consult the package manager
or consider building iperf3 from source.
Automated Execution
Quickly set up VPP and iperf3 server on DUT:
cd $NW_DS_WORKSPACE/dataplane-stack
./usecase/tcp_term/run_vpp_hs.sh -p 0001:01:00.0 -c 1
./usecase/tcp_term/run_iperf3_server.sh -p -c 2
Note
Replace sample address in above command with desired PCIe address on DUT.
On client node start the iperf3 client to connect to iperf3 server on DUT:
sudo taskset -c 1 iperf3 -c 172.16.3.1
Note
Core 1 is assumed to be isolated on client node.
If both iperf3 client and server run successfully, the measurement results will be printed by iperf3 client:
Connecting to host 172.16.3.1, port 5201
[  5] local 172.16.3.2 port 59118 connected to 172.16.3.1 port 5201
[ ID] Interval           Transfer     Bitrate         Retr  Cwnd
[  5]   0.00-1.00   sec  1.85 GBytes  15.9 Gbits/sec  183   1.39 MBytes
[  5]   1.00-2.00   sec  1.85 GBytes  15.9 Gbits/sec   44   1.37 MBytes
[  5]   2.00-3.00   sec  1.85 GBytes  15.9 Gbits/sec   26   1.35 MBytes
[  5]   3.00-4.00   sec  1.85 GBytes  15.9 Gbits/sec   33   1.54 MBytes
[  5]   4.00-5.00   sec  1.85 GBytes  15.9 Gbits/sec   42   1.64 MBytes
[  5]   5.00-6.00   sec  1.84 GBytes  15.8 Gbits/sec  110   1.35 MBytes
[  5]   6.00-7.00   sec  1.85 GBytes  15.9 Gbits/sec   24   1.54 MBytes
[  5]   7.00-8.00   sec  1.84 GBytes  15.8 Gbits/sec   35   1.38 MBytes
[  5]   8.00-9.00   sec  1.85 GBytes  15.9 Gbits/sec   27   1.21 MBytes
[  5]   9.00-10.00  sec  1.85 GBytes  15.9 Gbits/sec   21   1.41 MBytes
- - - - - - - - - - - - - - - - - - - - - - - - -
[ ID] Interval           Transfer     Bitrate         Retr
[  5]   0.00-10.00  sec  18.5 GBytes  15.9 Gbits/sec  545             sender
[  5]   0.00-10.00  sec  18.5 GBytes  15.9 Gbits/sec                  receiver
Stop VPP and iperf3:
./usecase/tcp_term/stop.sh
Manual Execution
Users can also set up VPP & iperf3 and test TCP termination case step by step.
DUT VPP Setup
Declare a variable to hold the CLI socket for VPP:
export sockfile="/run/vpp/cli.sock"
Run VPP as a daemon on core 1 with PCIe address and session layer enabled:
cd $NW_DS_WORKSPACE/dataplane-stack/components/vpp/build-root/install-vpp-native/vpp/bin
sudo ./vpp unix {cli-listen ${sockfile}} cpu {main-core 1} tcp {cc-algo cubic} dpdk {dev 0000:01:00.0 {name eth0}} session {enable use-app-socket-api}
Note
Replace sample address in above command with desired PCIe address on DUT.
Bring VPP Ethernet interface up and set IP address:
sudo ./vppctl -s ${sockfile} set interface state eth0 up
sudo ./vppctl -s ${sockfile} set interface ip address eth0 172.16.3.1/24
Declare a variable to hold the LD_PRELOAD library for VCL:
export LDP_PATH="$NW_DS_WORKSPACE/dataplane-stack/components/vpp/build-root/install-vpp-native/vpp/lib/aarch64-linux-gnu/libvcl_ldpreload.so"
Note
Any use of ~ in LDP_PATH will expand to the root user’s home directory when used later in the guide.
DUT iperf3 Server Setup
VCL parameters can be configured through VCL configuration file. A VCL configuration
sample for iperf3 server is provided at $NW_DS_WORKSPACE/dataplane-stack/usecase/tcp_term/vcl_iperf3_server_pn.conf
with the following contents:
vcl {
  rx-fifo-size 4000000
  tx-fifo-size 4000000
  app-scope-global
  app-socket-api /var/run/vpp/app_ns_sockets/default
}
The above configures VCL to request 4MB receive and transmit FIFO sizes and access to global session scope. For more VCL parameters usage, refer to VPP VCL reference.
VCL_CONFIG provides VCL with a configuration file to read during startup. Start
the iperf3 server on core 2 as a daemon over VPP’s host stack, providing the VCL
configuration file mentioned above:
sudo taskset -c 2 sh -c "LD_PRELOAD=${LDP_PATH} VCL_CONFIG=$NW_DS_WORKSPACE/dataplane-stack/usecase/tcp_term/vcl_iperf3_server_pn.conf iperf3 -4 -s -D"
To examine the iperf3 server session in VPP, use the command sudo ./vppctl -s ${sockfile} show session verbose.
Here is a sample output for iperf3 server session:
Connection                                                  State          Rx-f      Tx-f
[0:0][T] 0.0.0.0:5201->0.0.0.0:0                         LISTEN         0         0
Test
On client node run the iperf3 client to connect to the iperf3 server on DUT:
sudo taskset -c 1 iperf3 -c 172.16.3.1
Note
Core 1 is assumed to be isolated on client node.
If both iperf3 client and server run successfully, measurement results will be printed by iperf3 client:
Connecting to host 172.16.3.1, port 5201
[  5] local 172.16.3.2 port 59118 connected to 172.16.3.1 port 5201
[ ID] Interval           Transfer     Bitrate         Retr  Cwnd
[  5]   0.00-1.00   sec  1.85 GBytes  15.9 Gbits/sec  183   1.39 MBytes
[  5]   1.00-2.00   sec  1.85 GBytes  15.9 Gbits/sec   44   1.37 MBytes
[  5]   2.00-3.00   sec  1.85 GBytes  15.9 Gbits/sec   26   1.35 MBytes
[  5]   3.00-4.00   sec  1.85 GBytes  15.9 Gbits/sec   33   1.54 MBytes
[  5]   4.00-5.00   sec  1.85 GBytes  15.9 Gbits/sec   42   1.64 MBytes
[  5]   5.00-6.00   sec  1.84 GBytes  15.8 Gbits/sec  110   1.35 MBytes
[  5]   6.00-7.00   sec  1.85 GBytes  15.9 Gbits/sec   24   1.54 MBytes
[  5]   7.00-8.00   sec  1.84 GBytes  15.8 Gbits/sec   35   1.38 MBytes
[  5]   8.00-9.00   sec  1.85 GBytes  15.9 Gbits/sec   27   1.21 MBytes
[  5]   9.00-10.00  sec  1.85 GBytes  15.9 Gbits/sec   21   1.41 MBytes
- - - - - - - - - - - - - - - - - - - - - - - - -
[ ID] Interval           Transfer     Bitrate         Retr
[  5]   0.00-10.00  sec  18.5 GBytes  15.9 Gbits/sec  545             sender
[  5]   0.00-10.00  sec  18.5 GBytes  15.9 Gbits/sec                  receiver
Stop
Kill VPP:
sudo pkill -9 vpp
Kill iperf3 server:
sudo pkill -9 iperf3
Suggested Experiments
For jumbo packets, increase VPP TCP MTU and buffer size to improve the performance. Below is VPP example configuration:
tcp {
    cc-algo cubic
    mtu 9000
}
buffers {
    default data-size 10000
}