VPP L2 Switching
Introduction
VPP L2 Switching implements the typical 48-bit destination MAC addresses based packet forwarding function. Packet forwarding information is stored in the l2fib table. Below L2 features are supported:
Forwarding
MAC Learning
Flooding
The l2fib table starts out empty. Static table entries can be added manually. Additionally, the VPP switch can dynamically learn table entries while it switches frames.
When the VPP switch receives a frame, it will first record the source MAC and input interface into the l2fib. This is how VPP performs MAC learning. Next, VPP will determine which interface(s) to transmit the frame out on. VPP will look up the egress interface in the l2fib using the frame’s destination MAC address. If there is no entry matching the destination MAC address in the l2fib, then VPP will flood the frame out every interface connected on the same bridge domain.
This guide explains in detail on how to use the VPP based L2 switching using either memif or DPDK interfaces. Other interfaces supported by VPP (e.g. veth) should follow a similar setup, but are not covered in this guide. Users can execute bundled scripts in dataplane-stack repo to quickly establish the L2 switching cases or manually run the use cases by following detailed guidelines step by step.
Memif Connection
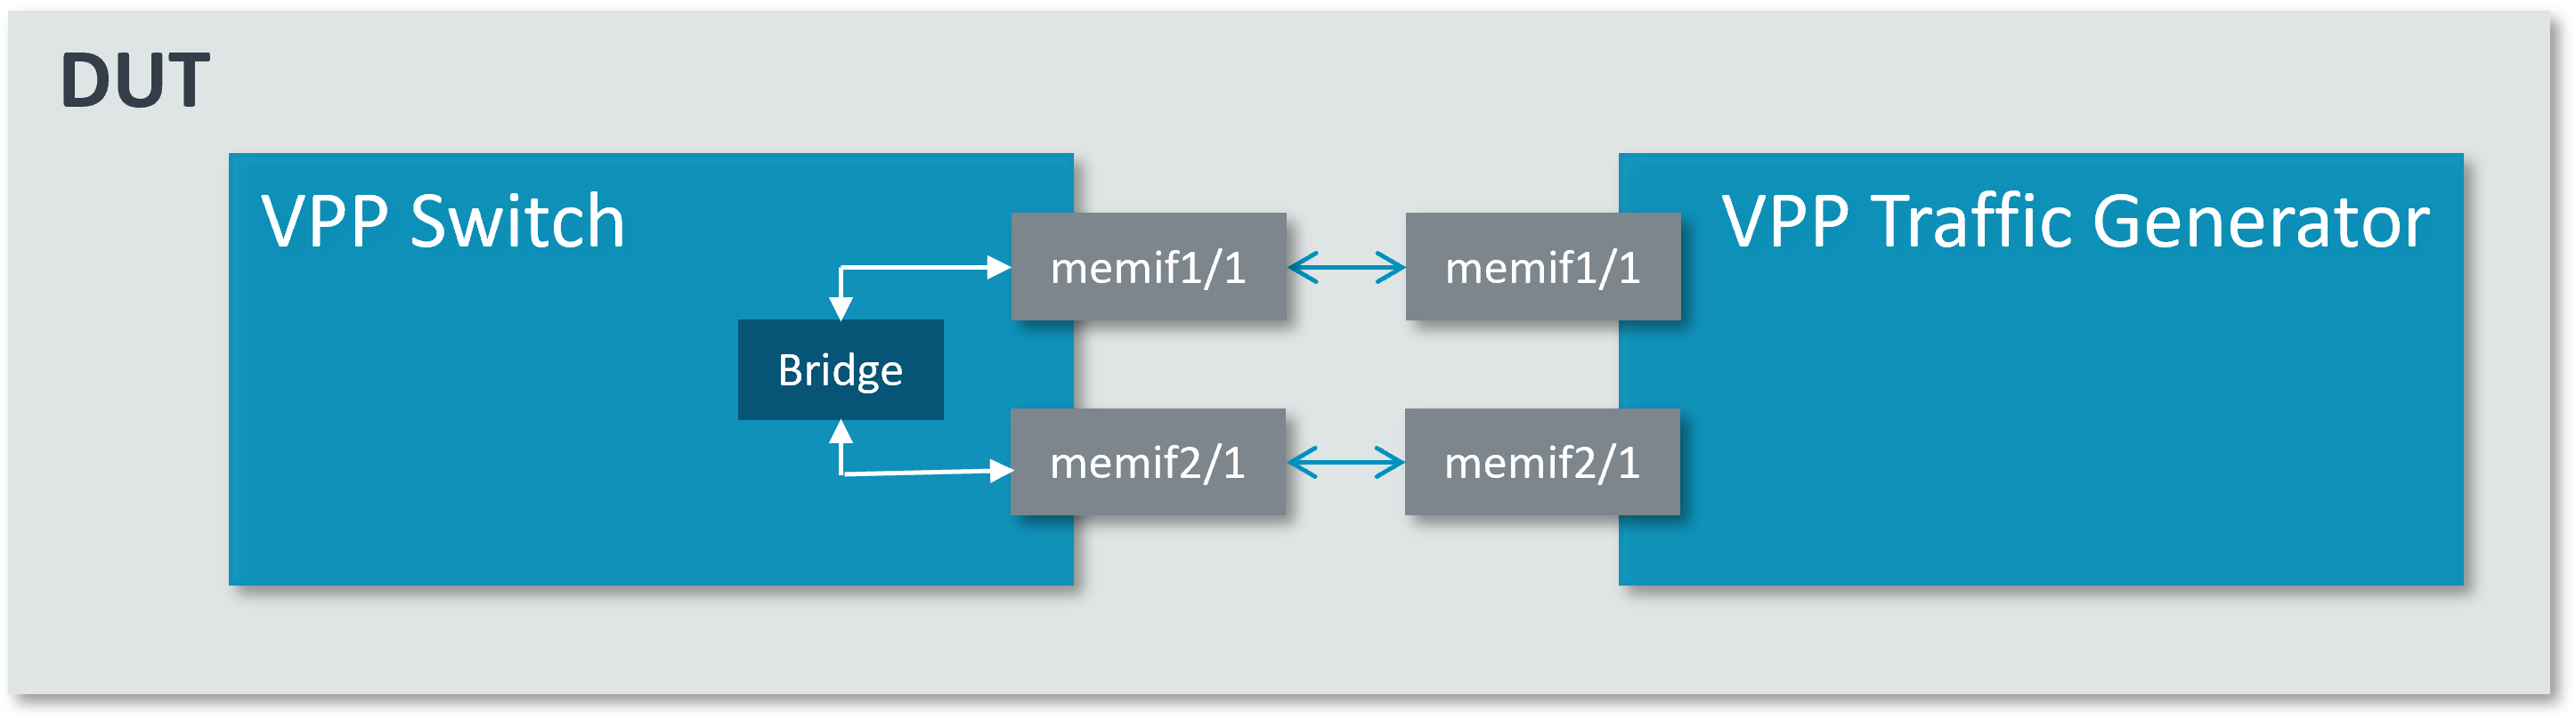
Shared memory packet interface (memif) is software emulated Ethernet interface, which provides high performance packet transmit and receive between VPP and user application or multiple VPP instances.
In this setup, two pairs of memif interfaces are configured to connect VPP L2 switch instance and VPP based traffic generator.
Memif connection
Note
This setup requires at least two isolated cores for VPP workers. Cores 2 and 4 are assumed to be isolated in this guide.
Automated Execution
Quickly set up VPP switch/traffic generator and test L2 switching use case:
cd <nw_ds_workspace>/dataplane-stack
./usecase/l2_switching/run_vpp_sw.sh -m -c 1,2
./usecase/l2_switching/run_vpp_tg.sh -c 3,4
Note
Use -h to check scripts supported options.
Examine VPP switch memif interfaces rx/tx counters after several seconds:
./usecase/l2_switching/traffic_monitor.sh
Here is a sample output:
  Name          Idx    State  MTU (L3/IP4/IP6/MPLS)     Counter          Count
local0           0     down          0/0/0/0
memif1/1         1      up          9000/0/0/0         rx packets       35205632
                                                       rx bytes       2253160448
memif2/1         2      up          9000/0/0/0         tx packets       35205632
                                                       tx bytes       2253160448
Stop VPP:
./usecase/l2_switching/stop.sh
Manual Execution
Users can also set up VPP switch/traffic generator and test L2 switching case step by step.
VPP Switch Setup
Declare a variable to hold the CLI socket for VPP switch:
export sockfile_sw="/run/vpp/cli_sw.sock"
Run a VPP instance as L2 switch on cores 1 & 2:
cd <nw_ds_workspace>/dataplane-stack/components/vpp/build-root/install-vpp-native/vpp/bin
sudo ./vpp unix {cli-listen ${sockfile_sw}} cpu {main-core 1 corelist-workers 2} plugins {plugin dpdk_plugin.so {disable}}
For more VPP configuration parameters, refer to VPP configuration reference.
Create memif interfaces and associate interfaces with a bridge domain:
sudo ./vppctl -s ${sockfile_sw} create memif socket id 1 filename /tmp/memif_dut_1
sudo ./vppctl -s ${sockfile_sw} create int memif id 1 socket-id 1 rx-queues 1 tx-queues 1 master
sudo ./vppctl -s ${sockfile_sw} create memif socket id 2 filename /tmp/memif_dut_2
sudo ./vppctl -s ${sockfile_sw} create int memif id 1 socket-id 2 rx-queues 1 tx-queues 1 master
sudo ./vppctl -s ${sockfile_sw} set interface mac address memif1/1 02:fe:a4:26:ca:f2
sudo ./vppctl -s ${sockfile_sw} set interface mac address memif2/1 02:fe:51:75:42:42
sudo ./vppctl -s ${sockfile_sw} set int state memif1/1 up
sudo ./vppctl -s ${sockfile_sw} set int state memif2/1 up
sudo ./vppctl -s ${sockfile_sw} set interface l2 bridge memif1/1 10
sudo ./vppctl -s ${sockfile_sw} set interface l2 bridge memif2/1 10
Add a static entry with MAC address 00:00:0a:81:00:02 and interface memif2/1 to l2fib table:
sudo ./vppctl -s ${sockfile_sw} l2fib add 00:00:0a:81:00:02 10 memif2/1 static
To display the entries of the l2fib table, use the command sudo ./vppctl -s ${sockfile_sw} show l2fib all.
Here is a sample output for the static l2fib entry added previously:
    Mac-Address     BD-Idx If-Idx BSN-ISN Age(min) static filter bvi         Interface-Name
00:00:0a:81:00:02    1      2      0/0      no      *      -     -             memif2/1
L2FIB total/learned entries: 1/0  Last scan time: 0.0000e0sec  Learn limit: 16777216
For more detailed usage of VPP commands used above, refer to the following links:
To explore more on VPP’s available commands, please review VPP CLI reference.
Test
Declare a variable to hold the CLI socket for VPP traffic generator:
export sockfile_tg="/run/vpp/cli_tg.sock"
Run another VPP instance as software traffic generator on cores 3 & 4:
sudo ./vpp unix {cli-listen ${sockfile_tg}} cpu {main-core 3 corelist-workers 4} plugins {plugin dpdk_plugin.so {disable}}
Create memif interfaces and traffic flow with destination MAC address of 00:00:0a:81:00:02:
sudo ./vppctl -s ${sockfile_tg} create memif socket id 1 filename /tmp/memif_dut_1
sudo ./vppctl -s ${sockfile_tg} create int memif id 1 socket-id 1 rx-queues 1 tx-queues 1 slave
sudo ./vppctl -s ${sockfile_tg} create memif socket id 2 filename /tmp/memif_dut_2
sudo ./vppctl -s ${sockfile_tg} create int memif id 1 socket-id 2 rx-queues 1 tx-queues 1 slave
sudo ./vppctl -s ${sockfile_tg} set interface mac address memif1/1 02:fe:a4:26:ca:ac
sudo ./vppctl -s ${sockfile_tg} set interface mac address memif2/1 02:fe:51:75:42:ed
sudo ./vppctl -s ${sockfile_tg} set int state memif1/1 up
sudo ./vppctl -s ${sockfile_tg} set int state memif2/1 up
sudo ./vppctl -s ${sockfile_tg} packet-generator new "{        \
                                        name tg0                  \
                                        limit -1                  \
                                        size 64-64                \
                                        node memif1/1-output      \
                                        tx-interface memif1/1     \
                                        data {                    \
                                        IP4: 00:00:0a:81:00:01 -> 00:00:0a:81:00:02  \
                                        UDP: 192.81.0.1 -> 192.81.0.2  \
                                        UDP: 1234 -> 2345         \
                                        incrementing 8            \
                                        }                         \
                                    }"
Start to send the traffic to VPP switch instance over memif1/1:
sudo ./vppctl -s ${sockfile_tg} packet-generator enable-stream tg0
Then VPP switch instance will forward those packets out on interface memif2/1.
After several seconds, use the command sudo ./vppctl -s ${sockfile_sw} show interface
to display VPP switch interfaces rx/tx counters. Here is a sample output:
  Name          Idx    State  MTU (L3/IP4/IP6/MPLS)     Counter          Count
local0           0     down          0/0/0/0
memif1/1         1      up          9000/0/0/0         rx packets       35205632
                                                       rx bytes       2253160448
memif2/1         2      up          9000/0/0/0         tx packets       35205632
                                                       tx bytes       2253160448
Ethernet Connection
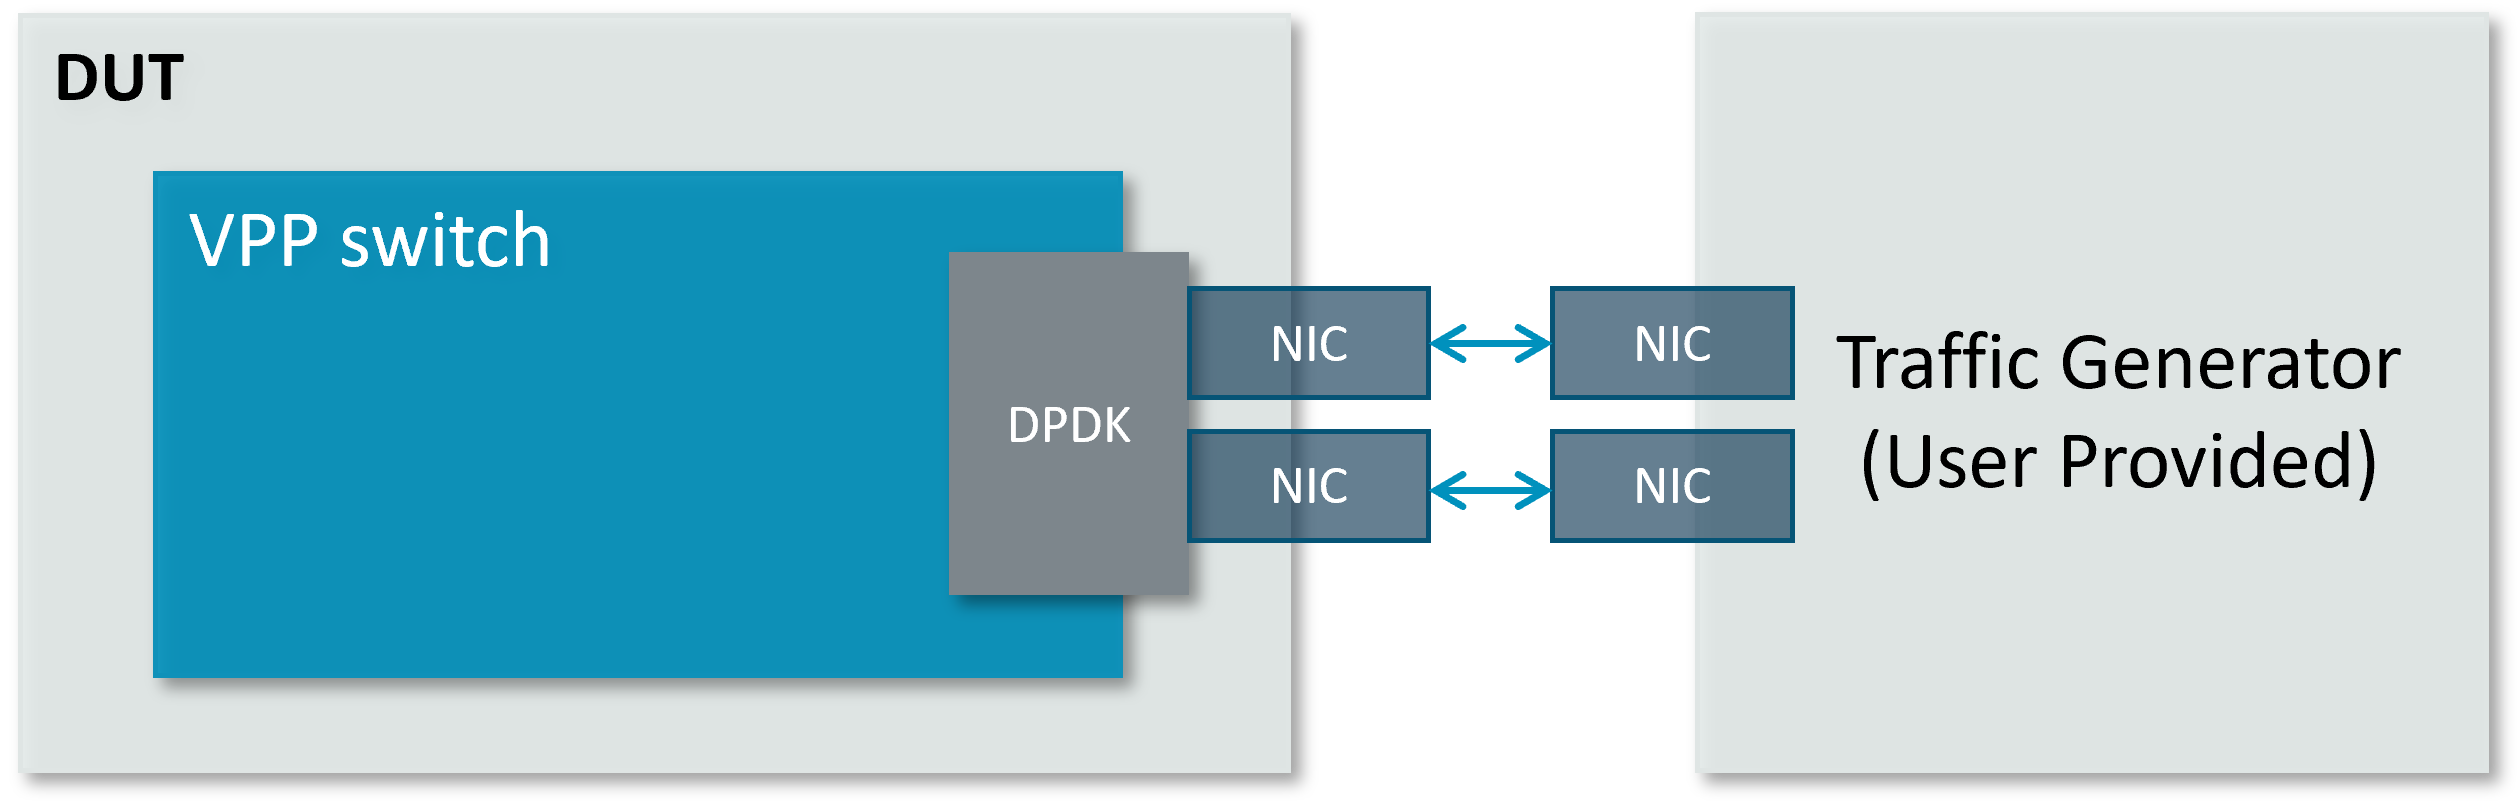
In this L2 switching scenario, DUT and traffic generator run on separated hardware platforms and are connected with Ethernet adapters and cables. The traffic generator could be software-based, e.g., VPP/TRex/TrafficGen running on regular servers, or hardware platforms, e.g., IXIA/Spirent Smartbits.
Ethernet connection
Find out which DUT interfaces are connected with traffic generator.
sudo ethtool --identify <interface_name> will typically blink a light on the NIC
to help identify the physical port associated with the interface.
Get interface names and PCIe addresses from lshw command:
sudo lshw -c net -businfo
The output will look similar to:
Bus info          Device      Class      Description
====================================================
pci@0000:07:00.0  eth0        network    RTL8111/8168/8411 PCI Express Gigabit Ethernet Controller
pci@0001:01:00.0  enP1p1s0f0  network    MT27800 Family [ConnectX-5]
pci@0001:01:00.1  enP1p1s0f1  network    MT27800 Family [ConnectX-5]
Of the two interfaces connected to the traffic generator, arbitrarily choose one
to be the input interface and the other to be the output interface. In this setup
example, enP1p1s0f0 at PCIe address 0001:01:00.0 is the input interface,
and enP1p1s0f1 at PCIe address 0001:01:00.1 is the output interface.
Automated Execution
Quickly set up VPP switch with input/output interface PCIe addresses on specified cores:
cd <nw_ds_workspace>/dataplane-stack
./usecase/l2_switching/run_vpp_sw.sh -p 0001:01:00.0,0001:01:00.1 -c 1,2
Note
Replace sample addresses in above command with desired PCIe addresses on DUT.
Configure traffic generator to send packets to VPP input interface with a destination
MAC address of 00:00:0a:81:00:02, then VPP switch will forward those packets out
on VPP output interface.
Examine VPP switch DPDK interfaces rx/tx counters after several seconds:
./usecase/l2_switching/traffic_monitor.sh
Here is a sample output:
 Name               Idx    State  MTU (L3/IP4/IP6/MPLS)     Counter          Count
local0               0     down          0/0/0/0
eth0                 1      up          9000/0/0/0     rx packets              25261056
                                                       rx bytes             37891584000
eth1                 2      up          9000/0/0/0     tx packets              25261056
                                                       tx bytes             37891584000
Note
VPP eth0 is the aliased name of the input interface, which is at PCIe address 0001:01:00.0 in the example.
VPP eth1 is the aliased name of the output interface, which is at PCIe address 0001:01:00.1 in the example.
Stop VPP switch:
./usecase/l2_switching/stop.sh
Manual Execution
Users can also set up VPP switch and test L2 switching case step by step.
VPP Switch Setup
Declare a variable to hold the CLI socket for VPP switch:
export sockfile_sw="/run/vpp/cli_sw.sock"
Run a VPP instance as L2 switch on cores 1 & 2 with input/output interface’s PCIe addresses:
cd <nw_ds_workspace>/dataplane-stack/components/vpp/build-root/install-vpp-native/vpp/bin
sudo ./vpp unix {cli-listen ${sockfile_sw}} cpu {main-core 1 corelist-workers 2} dpdk {dev 0000:01:00.0 {name eth0} dev 0000:01:00.1 {name eth1}}
Note
Replace sample addresses in above command with desired PCIe addresses on DUT.
Bring two Ethernet interfaces in VPP switch up and associate them with a bridge domain:
sudo ./vppctl -s ${sockfile_sw} set interface state eth0 up
sudo ./vppctl -s ${sockfile_sw} set interface state eth1 up
sudo ./vppctl -s ${sockfile_sw} set interface l2 bridge eth0 10
sudo ./vppctl -s ${sockfile_sw} set interface l2 bridge eth1 10
Add a static entry with MAC address 00:00:0a:81:00:02 and interface eth1 to l2fib table:
sudo ./vppctl -s ${sockfile_sw} l2fib add 00:00:0a:81:00:02 10 eth1 static
To display the entries of the l2fib table, use the command sudo ./vppctl -s ${sockfile_sw} show l2fib all.
Here is a sample output for the static l2fib entry added previously:
    Mac-Address     BD-Idx If-Idx BSN-ISN Age(min) static filter bvi         Interface-Name
 00:00:0a:81:00:02    1      2      0/0      no      *      -     -             eth1
L2FIB total/learned entries: 1/0  Last scan time: 0.0000e0sec  Learn limit: 16777216
For more detailed usage of VPP DPDK section used above, refer to the following link,
Test
Configure traffic generator to send packets to VPP input interface eth0 with
a destination MAC address of 00:00:0a:81:00:02, then VPP switch will forward
those packets out on VPP output interface eth1.
Use the command sudo ./vppctl -s ${sockfile_sw} show interface to
display VPP switch interfaces rx/tx counters. Here is a sample output:
 Name               Idx    State  MTU (L3/IP4/IP6/MPLS)     Counter          Count
local0               0     down          0/0/0/0
eth0                 1      up          9000/0/0/0     rx packets              25261056
                                                       rx bytes             37891584000
eth1                 2      up          9000/0/0/0     tx packets              25261056
                                                       tx bytes             37891584000